
In the realm of video editing and production, visuals often steal the spotlight. Explosions, breathtaking landscapes, and captivating performances can draw us into a narrative or showcase a product. Yet, here’s a secret whispered among the insiders of the industry: audio editing is the unsung hero, the magical thread that stitches the visual tapestry together.
Adobe Premiere Pro is a powerful video editing software that also includes a variety of audio editing tools. While it is not a dedicated audio editing software like Adobe Audition, Premiere Pro is still capable of performing many basic and advanced audio editing tasks.
Premiere Pro includes a variety of audio editing tools, such as trimming, cutting, splitting, and merging audio clips. It also includes tools for adjusting audio levels, applying audio effects, and reducing noise. It can even allow you to edit multiple audio tracks simultaneously, making it easy to mix and match different audio clips. This is especially useful for editing videos with dialogue, music, and sound effects.
Understanding the Audio Workspace
The Audio Workspace in Adobe Premiere Pro is a specialized workspace that provides you with the tools you need to edit and mix audio in your video projects. It is designed to be efficient and easy to use, even for users who are new to audio editing.
To open the Audio Workspace, go to Window > Workspaces and select Audio.
The Audio Workspace is divided into several panels, each of which serves a specific purpose:
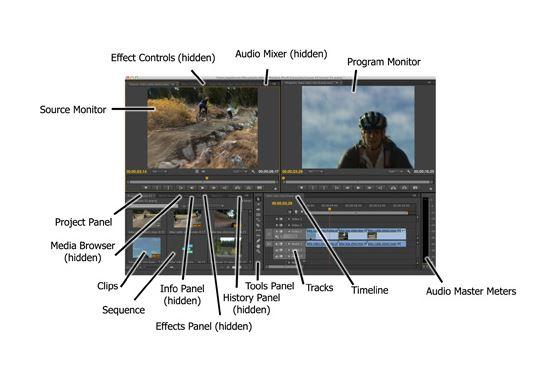
- Timeline: The Timeline displays all of the audio and video clips in your project. You can use the Timeline to trim clips, arrange them in order, and add effects.
- Source Monitor: The Source Monitor displays the audio or video clip that you are currently working on. You can use the Source Monitor to preview clips, trim them, and add markers.
- Audio Mixer: The Audio Mixer allows you to adjust the volume, panning, and other settings for each audio track in your project. You can also use the Audio Mixer to add audio effects to your tracks.
- Essential Sound: The Essential Sound panel provides you with a variety of tools for cleaning up audio, adjusting levels, and adding effects. It is a great starting point for users who are new to audio editing.
In addition
The Audio Workspace also includes a number of other features that are specifically designed for audio editing, such as:
- Audio meters: Audio meters allow you to monitor the levels of your audio tracks and ensure that they are not clipping.
- Audio waveforms: Audio waveforms provide you with a visual representation of your audio clips, making it easier to identify and edit specific sections of audio.
- Frequency spectrum analyzer: The frequency spectrum analyzer allows you to see the frequency distribution of your audio clips, which can be helpful for identifying and correcting problems with your audio.
This blog post will provide a comprehensive overview of audio editing in Adobe Premiere Pro, including the following topics:
- Importing and organizing audio clips
- Editing audio clips
- Mixing audio
- Adding audio effects
- Exporting audio
Conveniently, Premiere Pro includes a wide range of audio effects, such as reverb, delay, equalization, and compression. These effects can be used to improve the sound quality of your audio and to create different effects.
Importing and organizing audio clips
The first step in editing audio in Premiere Pro is to import your audio clips into the project. To do this, simply drag and drop the audio files from your computer into the project panel.
Once your audio clips have been imported, you can organize them by creating tracks in the timeline. To create a new track, right-click in the timeline and select Audio Track. You can then drag and drop your audio clips onto the desired tracks.
How to extract and isolate an audio from a video
- Import Your Video Clip:Open Adobe Premiere Pro and create a new project. Then, import the video clip from which you want to extract the audio. To do this, go to “File” > “Import” and select your video file.
- Create a New Sequence:After importing the video, you need to create a sequence that matches the settings of your video clip. Right-click on the video clip in the Project Panel, select “New Sequence from Clip,” and Adobe Premiere Pro will create a new sequence with the correct settings.
- View the Timeline:Click on the “Timeline” panel at the bottom of the workspace to bring it into focus. This is where you’ll perform your audio extraction.
- Locate the Audio Track:In the Timeline panel, you’ll see the video clip represented as a video track and an audio track. To isolate the audio, you can either:
- Mute the Video Track: Click on the “eye” icon next to the video track to hide it, or
- Unlink Audio and Video: Right-click on the video clip in the timeline and choose “Unlink.” This will separate the audio from the video, allowing you to delete the video track if you prefer.
- Export the Isolated Audio:To export the isolated audio as a separate audio file, go to “File” > “Export” > “Media.” This opens the Export Settings window.
Editing audio clips
Once your audio clips have been organized, you can start editing them. To trim a clip, simply drag the in and out points on the timeline. You can also split clips or cut them into smaller pieces.
To adjust the volume of a clip, select the clip in the timeline and then use the audio level slider in the Effects Controls panel. You can also use the Gain effect to adjust the volume of a clip.
Mixing audio
Once you have edited your audio clips, you can start mixing them. Mixing involves adjusting the levels of all of the audio tracks in your project so that they sound good together.
To mix audio in Premiere Pro, you can use the Audio Mixer panel. The Audio Mixer panel displays all of the audio tracks in your project and allows you to adjust their levels individually.
You can also use the Audio Mixer panel to add effects to your audio tracks. To do this, simply drag and drop an audio effect from the Effects panel onto the desired audio track in the Audio Mixer panel.
Adding audio effects
Adobe Premiere Pro includes a variety of audio effects that can be used to improve the sound of your audio. Some of the most common audio effects include:
- Equalizer: An equalizer allows you to adjust the frequency response of an audio clip. This can be used to boost or cut certain frequencies, such as bass or treble.
- Compressor: A compressor reduces the dynamic range of an audio clip, making the loudest parts softer and the softest parts louder. This can be used to make audio sound more consistent and easier to hear.
- Limiter: A limiter prevents the output signal from exceeding a certain level. This can be used to prevent clipping, which is a distortion that can occur when audio is too loud.
To add an audio effect to a clip, simply drag and drop the effect from the Effects panel onto the clip in the timeline. You can then adjust the settings of the effect in the Effects Controls panel.
Exporting audio
Once you have finished editing and mixing your audio, you can export it as a separate file. To do this, go to File > Export > Media.
In the Export Media dialog box, select Audio as the export format and then choose a location and filename for your exported audio file.
You can also choose to export your audio with different settings, such as sample rate and bit depth. In the Export Settings window, you can choose your desired audio format. Common formats include WAV, MP3, or AAC. Select the format that suits your needs.
Click on the “Audio” tab in the Export Settings window to configure audio settings. You can adjust the sample rate, bitrate, and other audio parameters as needed. Below the settings, you can specify the output file name and location by clicking on the “Output Name” field.
Once you’ve configured your export settings, click the “Export” button at the bottom of the Export Settings window. Adobe Premiere Pro will render the isolated audio and save it as a separate file in the location you specified.
Confirm Export:Adobe Premiere Pro will show a progress bar as it exports the audio. Once the export is complete, you can check the output folder for the isolated audio file.
Conclusion
Adobe Premiere Pro offers a wide range of audio editing features that can be used to improve the sound of your video projects. By following the tips in this blog post, you can learn how to import and organize audio clips, edit audio clips, mix audio, add audio effects, and export audio.