Imagine bringing your favorite childhood cartoon characters to life. The fluidity of their movements, the expressiveness of their faces – it all started with the meticulous work of animators. But what if I told you that the tools used to create these masterpieces are now accessible to everyone, for free? That’s the magic of OpenToonz!
This opentoonz tutorial will take you from the very basics to advanced techniques, turning you into a pro user. With its step-by-step approach, you’ll master the fundamentals of this powerful software, transforming your creative visions into captivating animations.
OpenToonz is a free and open-source animation software that is based on the discontinued software Toon Boom Studio. It is a powerful tool that can be used to create professional-quality animation. However, it can be a bit daunting to learn how to use at first. This opentoonz tutorial will give you a step-by-step guide on how to craft animations on OpenToonz, from the most basic concepts to more advanced techniques.
Key Takeaways:
- Navigating the OpenToonz Interface: Conquer the basics of OpenToonz, from setting up projects to creating scenes and layers.
- Unleashing Your Artistic Flair: Master the art of drawing and adding effects, bringing your animated creations to life.
- Animating with Ease: Animate your drawings with precision and finesse, breathing life into your characters and scenes.
- Exporting Masterpieces: Share your animated masterpieces with the world by exporting them in various formats.
Whether you’re an aspiring animator or simply seeking to expand your creative horizons, this opentoonz tutorial is your gateway to OpenToonz mastery. OpenToonz offers a robust feature set for creating professional-quality animations!
Getting Started
OpenToonz’s story starts with a commercially available software called Toonz, developed in Italy by Digital Video. This powerful tool caught the eye of the world-renowned Studio Ghibli, the animation powerhouse behind films like Spirited Away and My Neighbor Totoro. Over the years, Studio Ghibli customized Toonz to perfectly suit their animation workflow, resulting in some of the most breathtaking hand-drawn films ever created.
Then, in 2016, something amazing happened. DWANGO, a Japanese internet company, acquired Toonz and made a historic decision: they released the software’s core functionalities as an open-source project under the name OpenToonz. This meant that anyone with a computer and a passion for animation could now use the same tools that gifted us iconic characters like Totoro and Ponyo.
OpenToonz: Feature-Packed and Free
But what exactly can you do with OpenToonz? Here’s a glimpse into its treasure trove of features:
- Traditional 2D Animation: Create beautiful frame-by-frame animations, just like the classic cartoons you grew up with. OpenToonz provides a comprehensive set of tools for drawing, inking, and painting, allowing you to bring your characters and worlds to life.
- Digital Animation with Raster and Vector Support: Not a fan of traditional drawing? No problem! OpenToonz offers seamless integration with digital tools, allowing you to create clean vector graphics or expressive raster illustrations within the software itself.
- Advanced Features for Professional Results: OpenToonz boasts functionalities like vectorization (which converts raster images into clean vector shapes), 3D integration, and special effects compositing. These features empower you to create professional-looking animations with depth and complexity.
- A Thriving Open-Source Community: One of the biggest advantages of OpenToonz is its active and supportive community. With online forums and tutorials readily available, you’ll never be alone on your animation journey. Fellow animators and developers are always there to answer your questions, share tips, and contribute to the software’s ongoing improvement.
Opentoonz Tutorial Step 1: Creating a Project
The first thing you need to do is download and install OpenToonz. You can do this from the OpenToonz website. Once you have installed OpenToonz, you can launch the program and create a new project.
To create a new project, go to File > New. You will be prompted to enter a project name and directory. Once you have done this, you will be taken to the Project Settings window.
In the Project Settings window, you can set the project’s resolution, frame rate, and other options. Once you are satisfied with your settings, click OK.
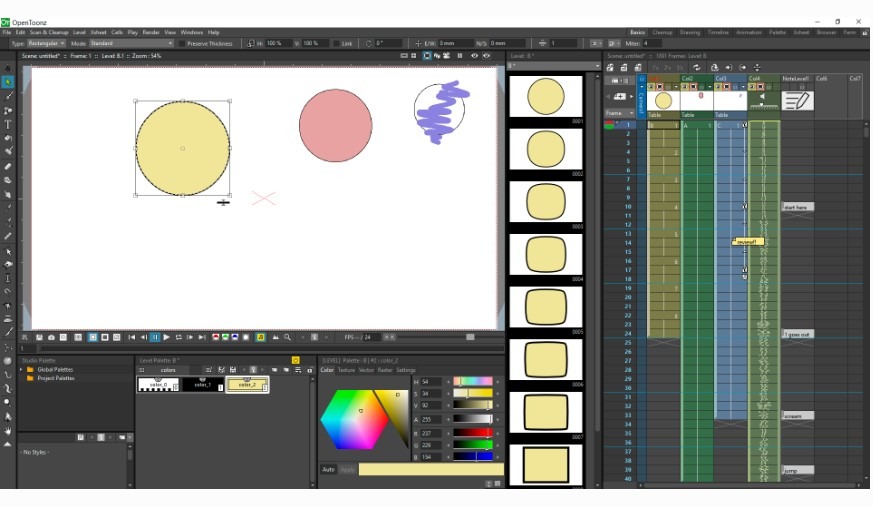
Basic Drawing and Animation:
Discover the magic of OpenToonz drawing tools. From pencils to brushes, master the art of creating simple shapes and lines. Bring life to your drawings with a beginner-friendly bouncing ball animation.
Opentoonz Tutorial Step 2: Creating a Scene
To create a new scene, go to File > New Scene. You will be prompted to enter a scene name. Once you have done this, you will be taken to the Scene Editor window.
In the Scene Editor window, you can add layers, create drawings, and add effects.
Adding Layers
To add a layer, go to Layer > New Layer. You will be prompted to enter a layer name. Once you have done this, the new layer will be added to the Layer Palette.
Layers are used to organize your animation. Each layer can contain a separate drawing. You can use layers to create different parts of your animation, such as the character, the background, and the effects.
Step 3: Creating Drawings
To create a drawing, go to the top right side of the software and select drawing. Once you have done this, you will be taken to the Drawing Editor window. The image below demonstrate that.
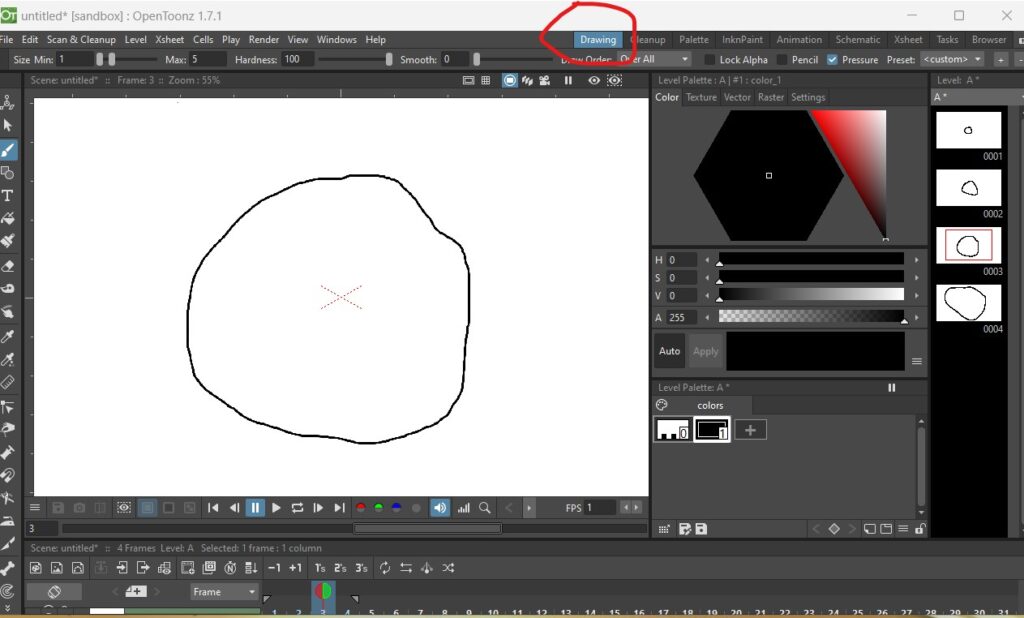
In the Drawing Editor window, you can draw your animation. You can use a variety of tools, such as the brush tool, the pen tool, and the eraser tool.
Opentoonz Tutorial Step 4: Adding Effects
Before diving into special effects, make sure you have a good grasp of basic animation principles. This includes understanding keyframes, timing, and easing.
Layer Organization: Ensure that your animation is well-organized with different elements on separate layers. This makes it easier to apply effects to specific parts of your animation.
Use the Level Strip: OpenToonz has a feature called the Level Strip that allows you to apply effects to specific frames or ranges of frames. You can find it in the Xsheet or by right-clicking on the column header.
Explore Effects in the FX Schematic: OpenToonz has a node-based compositing system called the FX Schematic. You can access it by clicking on the FX button in the top toolbar. Here, you can connect nodes to apply various effects to your animation. Experiment with nodes like Blur, Glow, and others to enhance your animation.
Apply Filters and Animate Effects:
OpenToonz provides a range of filters that can be applied to your drawings or animations. You can access these filters through the “Effect” menu. Some common filters include blur, sharpen, and color adjustments.
Utilize the animation features of OpenToonz to create dynamic effects. For example, you can animate the intensity of a glow effect or the size of a blur filter over time.
Particle Systems: OpenToonz also has a particle system that allows you to create effects like smoke, fire, or rain. Explore the “Particle” option in the FX menu to add realistic motion to your scenes.
Step 5: Refinement and Polishing
Become a maestro of animation timing and easing. Refine the fluidity of your animations, ensuring each movement is a symphony of visual delight. Venture into lip syncing, synchronizing character dialogue with precise mouth movements.
Post-Production Techniques: Dive into the world of color correction and grading. Elevate the visual appeal of your animations, making them ready for the big screen. Master the art of exporting your creations for various platforms.
Advanced Tips and Tricks
Shortcuts and Efficiency: Uncover the secrets of keyboard shortcuts for a seamless workflow. Customize your workspace to enhance efficiency, giving you more time to focus on your creative process.

Advanced Layer Techniques: Explore the possibilities of layer blending modes. Whether working with vectors or raster layers, learn to wield these tools with finesse.
Conclusion:
Join the thriving OpenToonz community. Engage in forums, seek inspiration from tutorials, and discover a wealth of resources that will fuel your animation journey. Unleash your imagination, breathe life into your drawings, and let the world witness the magic you create with OpenToonz.
This tutorial has given you a step-by-step guide on how to use OpenToonz. With practice, you will be able to create professional-quality animation.
Additional Resources
There are many resources available to help you learn OpenToonz. Here are a few of them:
- The OpenToonz website: https://opentoonz.github.io/e/
- The OpenToonz forum: https://groups.google.com/g/opentoonz_en
- The OpenToonz YouTube channel: https://m.youtube.com/watch?v=em2118K_XBc
The OpenToonz community is very helpful and there are many people who are willing to help you learn the software.
Happy animating!