If the only comments you receive on your latest Youtube podcast are: “change microphone”, “rotten sound”, “we can’t hear anything”… You need to change your audio configuration!
Alright people, let’s talk real. We all been there. You’re fired up, about to record that killer podcast episode or that voiceover that’ll land you that dream job, and then…cue dramatic music…you hit record and…woof. You sound like you’re broadcasting from the bottom of a well.
Let’s Fix That Voice
Been there, done that, my friends. But hold up, before you resign yourself to a lifetime of muffled voice acting, let’s break down how to get that crisp, clean audio that’ll make your listeners beg for more. Consider this your one-stop shop for building the ideal voice and podcast recording setup.
Now, I’m not gonna lie to you. We are not talking about turning your bathroom into Abbey Road studios here. But with a few smart choices and some savvy tricks, we can get you sounding smoother.
How Does Audio Recording Work, & What are the requirements to record sound in good quality on your computer?
Since sound is an analog physical phenomenon , we need to convert the sound into a digital signal. So we will need three things:
- A microphone (which will take the sound)
- A sound card integrated into the audio interface (which will convert the analog signal into a digital signal and vice versa)
- Sound software, also called DAW (Digital Audio Workstation)
The chain will be very simple: we will connect a microphone via an XLR cable to the sound card, the sound card to the computer and the DAW will be the software that will allow us to record.
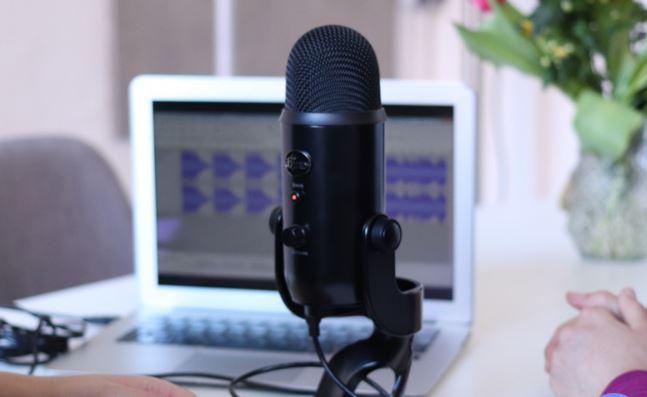
Which Microphone to Choose for Recording Your Podcast or Audio?
First things first, the microphone. This is your secret weapon, the translator that turns your voice into radio gold. Now, there’s a whole range of mics out there, from fancy studio setups to those little USB jobbies. Here’s the gist:
- USB Mics: Easy to use, perfect for beginners. Just plug it in and go! Think of them as the Instant Ramen of the microphone world – convenient, gets the job done, but maybe not Michelin-star worthy.
- XLR Mics: These guys require an extra audio interface thing, but they offer more control and better sound quality. Imagine them as the well-seasoned stir-fry of mics – a bit more effort, but the taste is phenomenal.
Do your research, figure out your budget, and remember, a good mic is an investment. Think of it as paying for that smoother voice you’ve always dreamed of.
To begin,
You must first ask yourself in what context are you recording your voice? Public or private place, parasitic noises or not.
- public place : dynamic microphone
- private place : condenser microphone any kind of interface and sensitive microphones
In both cases, you will find very good products for a hundred dollars or euros.
There are some microphones where we completely bypass the purchase of the sound card, since the microphone itself has an AD / DA converter (Analogic-Digital / Digital-Analogic – in short, the sound card).
Simply plug it into your computer and set it up as an audio input in your DAW. You can find a complete bundle at 100$ including the microphone, a microphone stand, an anti-pop filter (to reduce plosives…) its cable and free software.
Zoom: ideal equipment for nomadic podcasters
The Zoom brand is renowned for its very good quality and mobile equipment . Specialized in portable recorders of all types (some even integrating an HQ camera), they are very good sound recording company. Whether for interviews, field recording (noise recording technique in nature or otherwise), sound note recording or even as a digital audio recording solution, the Zoom is always a great buy.
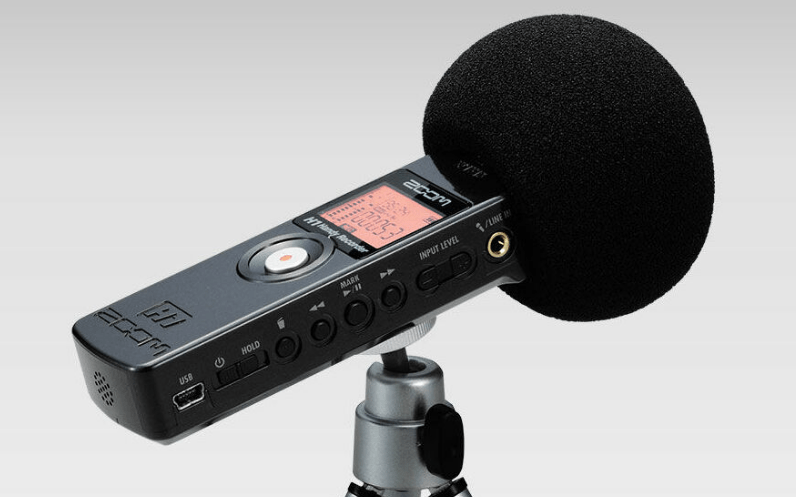
The built-in microphones are of very good quality, you can go there with your eyes closed. Count out around 100$ for the pack including the Zoom H1, the windscreen, a desktop tripod and other accessories. If you manage to find a model like the Zoom H1, which offers a balance of affordability and quality, making it a suitable choice for beginner podcasters. The H5 model has become a real reference for nomads.
Today, however, the range has expanded with the Zoom ZDM-1 . Cut for recording podcasts, this pack is above all designed for beginners , and this for a very small budget.
Pros: price, cable, headphones
Negative points: ambient noise, technique and discipline to position yourself in a good angle
The PodMic from Rode
The best of the best for podcast recording! This is also the model that equips our studios – and it’s not for nothing! With such precision, you can make all the EQ changes possible. In addition, since the PodMic has an internal pop filter, ambient noise should not pollute your recording.
Positive points: the clarity of the sound, the integrated filter, flexible positioning, finishes and value for money at the top
Negative points: the weight, and output volume
Mic Technique
Here’s the thing, there’s a right and wrong way to hold a microphone. Don’t be that person leaning in like they’re about to give the mic a big ol’ kiss. Keep it at a comfortable distance, usually a hand’s breadth or two away. And speak clearly, project your voice, but don’t yell. You’re not a drill sergeant, you’re a smooth-talking podcast host (or voiceover extraordinaire).
The Digital Audio Interface/External Sound Card
The audio interface (or otherwise known as an external sound card ) is the device that lets your sound in and out of your computer.
Since a lot of mobile microphones themselves integrate the conversion system between analog and digital, or the kits mentioned include a processing station, no need to take the cabbage .
On the other hand, if you already have a microphone worthy of the name, or if you are not satisfied with your current interface, there again, there is plenty to choose from!
Before going to checkout, take a closer look at your needs and the product descriptions : – how many microphones will be connected (2 minimum)? – how many inputs/outputs do you need? – How many preamps on the interface? – how many headphones must be connected? – can the output volume be adjusted on the interface? – 24 bits (less background noise) or not? – compatible with your OS? – Is there free software provided with your interface? etc…
Recording and Production Software OR DAW
There are a multitude of DAWs for many different uses. The best known being Ableton, Fruity Loops, ProTools, Logic Pro, Cubase (which, moreover, also produces its digital audio interface with its Steinberg brand … The goal is not to make an exhaustive list, let’s concentrate on a few DAWs that are easy to configure and not too expensive, even free.
Ableton Live- The Famous
The best known of all DAWs, because it is the easiest to learn and the one with the largest community. Ableton is very easy to configure, just open the preferences and choose your sound card as audio input and output, then click “record” to make your first recordings… The free version is limited to 8 tracks and some effects/instruments, but remains very good for a use as simple as it is.
AUDACITY – OPEN SOURCE!
A very simple, free and opensource DAW. The interface is a bit archaic and don’t expect to do more than simple audio editing with it. On the other hand, it has significant advantages: free, very easy to use and multi-platform: macOS, Windows and Linux. Visit the official website to download it!
Sound Processing and Some Mixing Tools
In audio production, there are generally three phases:
- The recording, a phase that we have just carried out using microphones, sound cards and recording software.
- Mixing is the phase where we process the sound in order to balance the different sound sources.
- Mastering phase is where the audio is standardized in order to optimize it for all media. We won’t go into that part because it’s more complex.
Let’s take a look at two simple mixing tools that, used intelligently, will significantly improve the sound in order to progress towards your ideal audio setup for recording audio or podcast video.
Equalization – The Treatment of Frequencies
Equalization is a very important phase of mixing. Sound is a complex set of audio frequencies (expressed in Hertz), ranging from 20Hz to 20kHz (this is the width of the spectrum that the human ear perceives). The equalizer is simply a set of filters, allowing to act (by boosting or decreasing) on the frequencies of your choice.
Insert an equalizer on the audio track where your voice is recorded and start working on the sound to understand how it works. There is no miracle recipe for equalization, but for a spoken voice, it is customary to cut the entire bottom of the spectrum up to 80Hz, the same for the treble from 14kHz to 20kHz.
The frequencies of the voice range from 80Hz to 1500Hz, so it is interesting to work on this range! You can start by using presets to see the difference.
Compression – Reduce Spectrum Dynamics
Compression is a tool for reducing the dynamic range of an audio track. Dynamics is the difference between the lowest level and the highest level. A piece with a lot of volume differences that can go from very loud to very low has a very high dynamic (jazz, classical music, etc.), conversely, music always having the same volume has no dynamic at all.
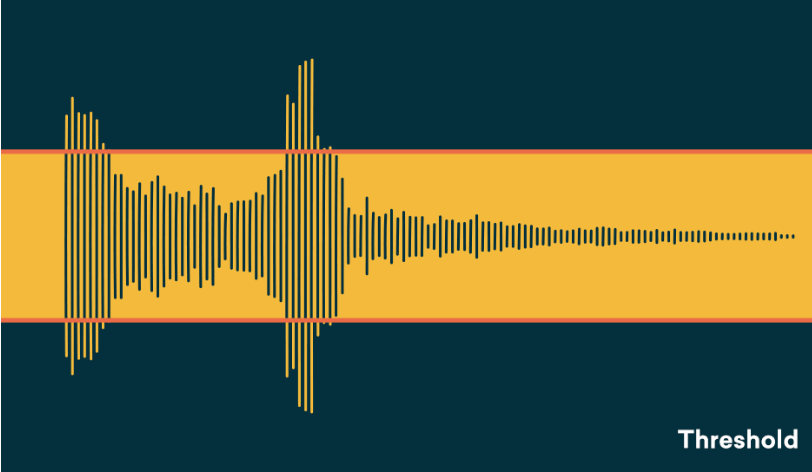
Compression will allow you to smooth out the volume and therefore make your voice more intelligible. Similarly, there is no miracle recipe, but a ratio halfway, with a threshold (threshold from which the compressor kicks in, expressed in dB) between -30dB and -40dB will allow you to better highlight your voice. Try out presets to understand how it works and hear what it does to the sound!
Practice Makes Perfect
Listen, even with the best setup, there’s always a learning curve. Record yourself, listen back, and see where you can improve. The more you practice, the more comfortable you’ll get with your voice and your equipment. And hey, maybe one day you’ll be the one giving recording advice!
So, there you have it. Your guide to ditching the tin-can audio and letting your voice shine. Remember, with a little planning and some know-how, you can record audio that’ll have your listeners hooked.
If you have gone through this article carefully, you will have understood that choosing the ideal equipment to start recording is above all about testing things . It’s the arrangement of many elements, readjustments and tweaks that will allow you to find the perfect configuration for you.
Pingback: The Essential Home Recording Studio Equipment - Team Grandly
Pingback: A Beginner's Guide to Audio-Visual (AV) Technology - TechVoltMedia
Pingback: How to Extend the Length of a Mini HDMI Cable - TechVoltMedia